How to Bulk Schedule Social Media Posts (CSV Upload Guide)


Bulk scheduling means uploading dozens or hundreds of social media posts at once — typically via CSV — and scheduling them all across multiple platforms in a single session. Instead of creating posts one at a time, you prepare everything in a spreadsheet, upload it, review the preview, and hit schedule.
If you're managing multiple social media accounts, posting 3-5 times per week per platform, and doing it all manually — you're spending 10-15 hours weekly on publishing alone. That's 40-60 hours a month of repetitive work that could be handled in a single afternoon.
The solution is bulk scheduling. In this guide, I'll walk you through the exact process: how to set up your CSV, what columns to include, how to handle media, and how to publish across Instagram, TikTok, YouTube, LinkedIn, Facebook, X, Threads, and Pinterest from one upload.
Want to skip the manual work? PostEverywhere's bulk scheduling tool lets you upload a CSV and schedule to all 8 platforms with automatic column mapping. Start your 7-day free trial — cancel anytime.
TL;DR
- Bulk scheduling = upload a CSV of posts and schedule them all at once
- Best for: creators batching a month of content, agencies managing multiple clients, businesses running campaigns
- What you need: a CSV with columns for caption, date, time, and platform (at minimum)
- Time saved: schedule 100+ posts in 15-20 minutes vs 10+ hours manually
- Tools: PostEverywhere, SocialPilot, Publer, or any scheduler with CSV import
Table of Contents
- What Is Bulk Scheduling?
- When to Use Bulk Scheduling vs Regular Scheduling
- Step 1: Prepare Your Spreadsheet
- Step 2: Format Your CSV Columns
- Step 3: Add Media to Your Posts
- Step 4: Upload and Map Columns
- Step 5: Preview and Edit
- Step 6: Schedule and Publish
- Platform-Specific Tips for Bulk Scheduling
- Common Bulk Scheduling Mistakes
- Bulk Scheduling Tools Compared
- FAQs
What Is Bulk Scheduling?
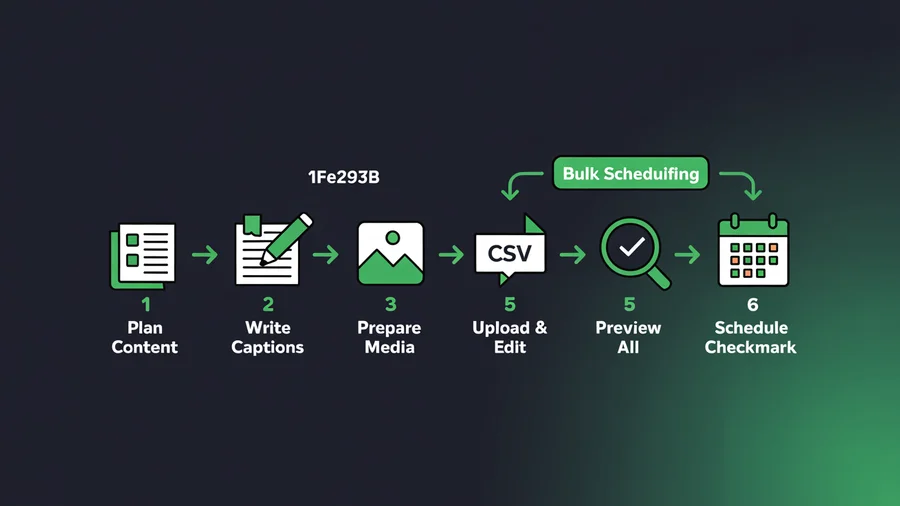
Bulk scheduling is the process of creating multiple social media posts in advance — usually in a spreadsheet — and uploading them all at once to a social media scheduler for automatic publishing. Instead of the normal workflow (open composer → write caption → upload image → pick time → publish → repeat), you prepare everything in batch and schedule it all in one go.
The typical workflow looks like this:
- Plan content in Google Sheets, Excel, or any CSV-compatible tool
- Write all captions with hashtags, mentions, and CTAs
- Prepare media (images, videos) or use AI to generate them — and double-check each asset against the social media aspect ratios cheat sheet so nothing gets cropped at publish
- Export as CSV and upload to your scheduling tool
- Map columns so the tool knows which column is the caption, date, platform, etc.
- Preview and edit individual posts if needed
- Hit schedule — all posts are queued for auto-publishing
This is how agencies managing 10-40 client accounts operate. It's also how solo creators plan a full month of content in one afternoon — see our guide on how to plan a month of social media content in one day.
When to Use Bulk Scheduling vs Regular Scheduling
Bulk scheduling isn't always the right choice. Here's when each approach makes sense:
Use bulk scheduling when:
- You batch-create content (weekly or monthly planning sessions)
- You manage multiple accounts or clients
- You're migrating from another scheduling tool (CSV export → CSV import)
- You're running a campaign with 20+ pre-planned posts
- You have a content calendar in a spreadsheet already
Use regular scheduling when:
- You create content reactively (trending topics, news, real-time posts)
- You post 1-3 times per week to 1-2 platforms
- You prefer the visual content calendar composer
- You're using AI content generation to create posts on the fly
Most power users combine both: bulk schedule the core content calendar, then add reactive posts through the regular composer as needed.
Pro tip: Even if you bulk schedule 80% of your content, leave room in your social media calendar for timely posts. Algorithms reward engagement, and responding to trends keeps your content fresh.
Step 1: Prepare Your Spreadsheet
Start with a clean spreadsheet in Google Sheets, Excel, or any tool that can export to CSV. Each row = one post. Each column = one piece of data.
Here's the minimum viable CSV structure:
| Caption | Date | Time | Platform |
|---|---|---|---|
| New product launch! Check the link in bio... | 2026-04-01 | 09:00 | |
| We just shipped something exciting... | 2026-04-01 | 10:30 | |
| Thread: 5 things we learned building... | 2026-04-02 | 08:00 | x |
Tips for the planning phase:
- One post per row. If you want the same caption on Instagram AND LinkedIn, create two rows — this lets you customize each version.
- Use cross-posting instead if you want one post published to multiple platforms simultaneously without customization. The how to cross-post on social media hub covers each major platform pair.
- Plan 2-4 weeks ahead. Bulk scheduling works best when you have a clear content plan. Use our free content calendar generator to map out topics.
- Group by theme or campaign. It's easier to batch-write 10 posts on the same topic than to jump between unrelated subjects.
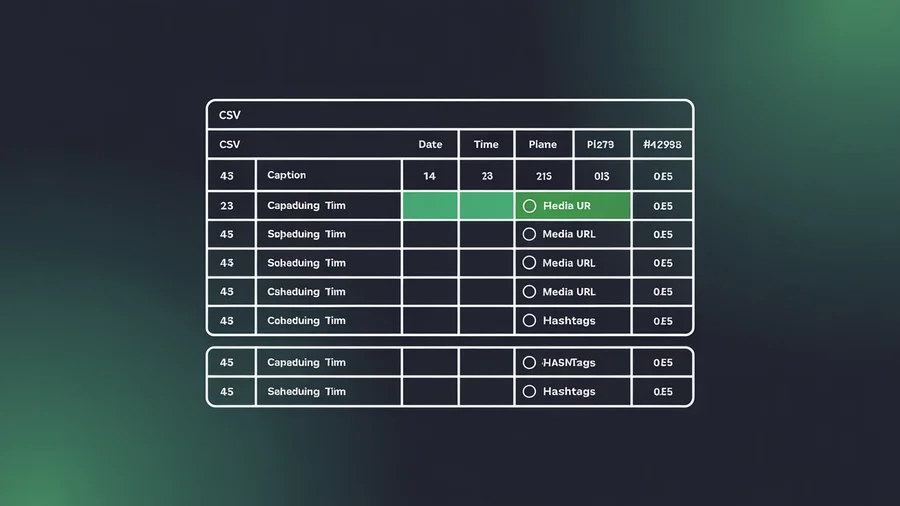
Step 2: Format Your CSV Columns
Your scheduling tool will map CSV columns to post fields. Here are the columns most tools support:
Required Columns
| Column | Format | Example |
|---|---|---|
| Caption | Plain text | "New feature alert! We just shipped..." |
| Date | YYYY-MM-DD | 2026-04-01 |
| Time | HH:MM (24h) | 14:30 |
Optional Columns
| Column | Format | Purpose |
|---|---|---|
| Platform | instagram, linkedin, tiktok, facebook, x, youtube, threads | Route to specific platform |
| Media URL | Direct link to image/video | Attach media automatically |
| Hashtags | #tag1 #tag2 #tag3 | Appended to caption |
| First Comment | Plain text | Instagram first-comment strategy |
| Account | Account name or ID | For multi-account management |
| Alt Text | Descriptive text | Image accessibility text |
Formatting Rules
- Dates: Use ISO format (YYYY-MM-DD). Avoid "April 1st" or "04/01/26" — parsers handle these inconsistently.
- Times: Use 24-hour format in your target timezone. 2:30 PM = 14:30.
- Captions: Wrap in quotes if they contain commas. Most CSV editors handle this automatically.
- Emojis: Supported. Just paste them directly into the caption cell.
- Line breaks: Use
\nfor line breaks within a caption, or wrap the cell content in quotes with actual newlines. - Leave time blank to let the scheduler auto-pick the best time to post based on your audience data.
Switching tools? Export your content calendar from Buffer, Hootsuite, Later, or Sprout Social as a CSV. Clean up the column headers to match your new tool's format, and import directly. Most migrations take under 30 minutes.
Step 3: Add Media to Your Posts
Bulk scheduling with media requires a bit more setup. There are two approaches:
Option A: Media URLs (Recommended)
Add a column with direct URLs to your images or videos. The scheduling tool downloads and attaches them automatically.
| Caption | Date | Time | Platform | Media URL |
|---|---|---|---|---|
| New product shot | 2026-04-01 | 09:00 | https://cdn.example.com/product-1.jpg |
Where to host media:
- Google Drive (set sharing to "anyone with link")
- Dropbox (use the direct download link, replace
dl=0withdl=1) - Your own CDN or website
- Cloud storage (S3, Cloudflare R2, etc.)
Option B: Upload Separately
Upload your CSV without media, then attach images/videos manually in the preview step. This works well when you have fewer than 20 posts or want to review media placement carefully.
Option C: Generate with AI
Upload a CSV with just captions and topics. Use PostEverywhere's AI image generator to create visuals for each post during the preview step. This is the fastest approach for text-heavy platforms like LinkedIn and X.
Media tips:
- Instagram: 1080×1080 (square), 1080×1350 (portrait), or 1080×1920 (Reels/Stories). See our social media image sizes guide.
- TikTok/YouTube Shorts: 1080×1920 vertical video
- LinkedIn: 1200×627 for link posts, 1080×1080 for image posts
- X: 1200×675 recommended
- Use our image resizer tools to batch-resize media before uploading
Step 4: Upload and Map Columns
Once your CSV is ready, upload it to your scheduling tool. Here's the PostEverywhere workflow:
- Navigate to the bulk upload section in your dashboard
- Drag and drop your CSV or click to browse
- Map columns: PostEverywhere auto-detects most column headers. If your headers are non-standard (e.g., "Post Text" instead of "Caption"), manually map them from the dropdown
- Set defaults: Choose a default platform and time if some rows are blank
- Confirm import: Review the total post count and any rows that failed validation
Common import errors and fixes:
| Error | Cause | Fix |
|---|---|---|
| "Invalid date" | Wrong date format | Convert to YYYY-MM-DD |
| "Date in the past" | Post scheduled before today | Update to a future date |
| "Platform not recognized" | Typo in platform name | Use: instagram, linkedin, tiktok, facebook, x, youtube, threads |
| "Caption too long" | Exceeds platform limit | Shorten or split across platforms |
| "Media URL unreachable" | Broken or private link | Check URL accessibility, ensure public sharing |
Step 5: Preview and Edit
After import, every post appears in an editable preview grid. This is your quality control step.
What to check:
- Caption accuracy — scan for formatting issues, broken emojis, or missing hashtags
- Media preview — confirm the right image/video is attached to each post
- Dates and times — spot scheduling conflicts (two posts to the same platform at the same time)
- Platform targeting — verify each post goes to the intended account
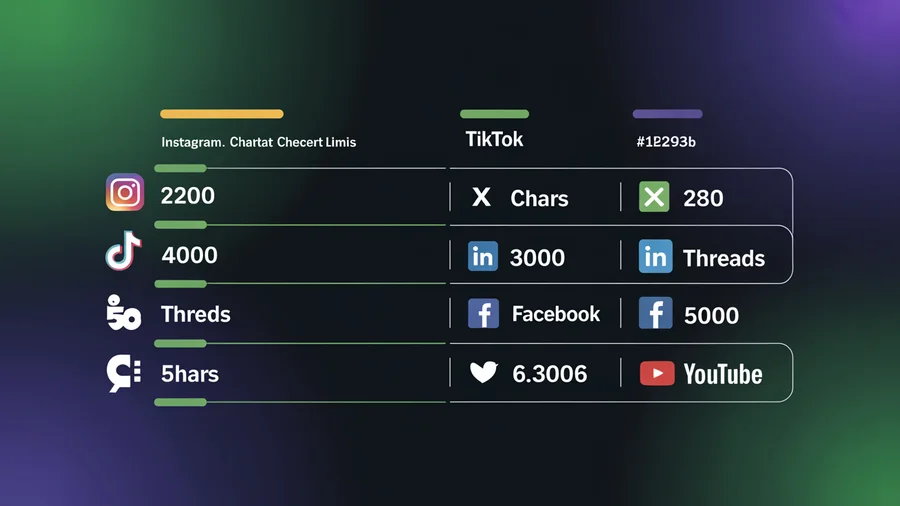
- Character limits — X has 280 characters, Threads has 500, LinkedIn has 3,000. Posts exceeding limits will be flagged
Editing in the preview grid:
- Click any post to edit the caption, change the time, or swap media
- Delete individual posts you want to remove from the batch
- Add posts manually if you want to fill gaps
- Drag to reorder or reschedule
Agencies: Use team workspaces so a manager can review the preview grid before scheduling goes live. Content creators upload the CSV, managers approve, and posts go out on schedule.
Step 6: Schedule and Publish
Once you're satisfied with the preview, hit "Schedule All." Every post is queued and will auto-publish at the assigned date and time.
After scheduling:
- Posts appear on your content calendar with visual indicators
- You can still edit, reschedule, or delete individual posts
- Failed posts (API errors, account disconnections) are flagged and retried automatically
- Track performance with cross-platform analytics after posts go live
Recommended workflow for ongoing bulk scheduling:
| Frequency | Batch Size | Who It's For |
|---|---|---|
| Weekly | 20-30 posts | Solo creators, small businesses |
| Bi-weekly | 50-80 posts | Growing brands, multi-platform publishers |
| Monthly | 100-200+ posts | Agencies, enterprise teams |
Platform-Specific Tips for Bulk Scheduling
Each platform has quirks that affect bulk scheduling. Here's what to know:
- Reels and carousels can be bulk scheduled, but each needs vertical video or multiple images respectively
- First comment is important for hashtag strategy — include a "first_comment" column in your CSV
- Alt text improves accessibility and SEO — add it as a column. Max 125 characters
- Use our Instagram scheduler for platform-specific features
TikTok
- Video only — every TikTok post needs a video file attached
- Captions max 4,000 characters (including hashtags)
- Sounds/music cannot be added via API — add them natively if needed
- If you're recycling videos from another network, remove the TikTok watermark before posting so the algorithm doesn't suppress reach
- See our TikTok scheduler guide
- Company pages and personal profiles require separate account connections
- Document/carousel posts are supported but need PDF uploads
- Article links in the caption get auto-previewed
- More at our LinkedIn scheduler
YouTube
- Videos and Shorts require video files (Shorts must be under 60 seconds, vertical)
- Title and description are separate fields — map them as distinct columns
- Thumbnails can be uploaded separately in the preview step
- Details in our YouTube scheduler
- Pages and groups are managed separately — specify which in your CSV
- Reels follow the same vertical video format as Instagram
- See our Facebook scheduler
X (Twitter)
- 280-character limit — keep captions short or they'll be truncated
- Threads (multi-tweet posts) require special formatting
- Visit our X scheduler
Threads
- 500-character limit for text posts
- Image and video posts supported
- Check our Threads scheduler
Common Bulk Scheduling Mistakes
1. Not customizing per platform. The same caption doesn't work everywhere. LinkedIn wants professional, long-form. X wants punchy and short. Instagram wants visual-first with hashtags. If you're posting the exact same text to all 8 platforms, you're leaving engagement on the table.
2. Scheduling everything at the same time. Posting to Instagram, LinkedIn, and X simultaneously at 9 AM floods your followers who follow you on multiple platforms. Stagger by 30-60 minutes or let best time to post analytics pick optimal times per platform.
3. Forgetting timezone differences. If your audience is global, schedule based on THEIR timezone, not yours. A 9 AM post in London is 4 AM in New York.
4. Not reviewing the preview grid. CSV formatting issues (broken line breaks, encoding problems, missing quotes) can mangle captions. Always review before scheduling.
5. Setting and forgetting for too long. Bulk scheduling a month ahead is efficient, but don't go dark. Check in weekly to respond to comments, engage with trending topics, and adjust if something isn't working.
6. Ignoring media requirements. Each platform has different image sizes, video lengths, and file format requirements. A video that works on TikTok (9:16 vertical) won't look right on LinkedIn (16:9 landscape). Use our social media image sizes guide as a reference.
Bulk Scheduling Tools Compared
| Tool | CSV Upload | Max Posts/Upload | Platforms | AI Features | Price |
|---|---|---|---|---|---|
| PostEverywhere | Yes | Unlimited | 7 | Full (captions, images, video) | $19-79/mo |
| SocialPilot | Yes | 500 | 9 | Limited | $26-170/mo |
| Publer | Yes | 500 | 9 | Basic | $12-84/mo |
| Buffer | No native CSV | — | 8 | Captions only | $6-120/mo |
| Hootsuite | Yes (Planner) | 350 | 10+ | Basic | $99-739/mo |
| Later | No | — | 6 | Captions only | $25-80/mo |
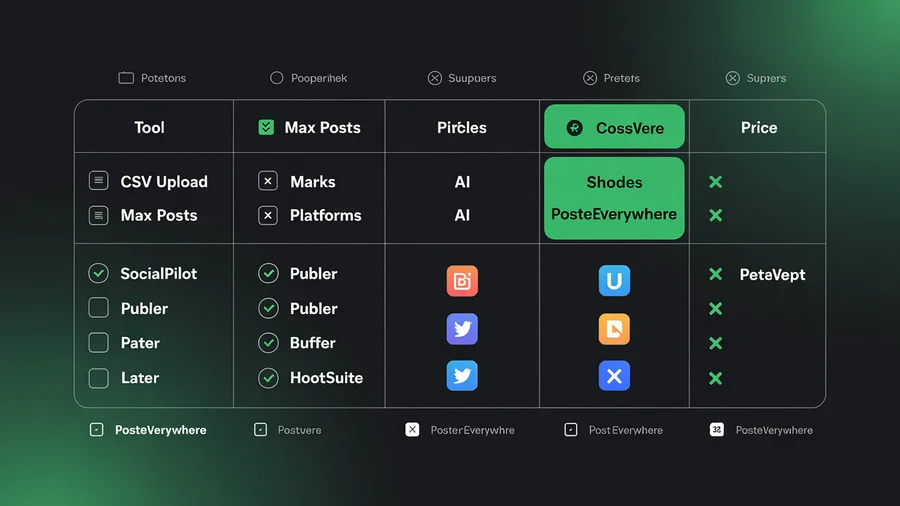
PostEverywhere is the only tool on this list with built-in AI content generation, AI image generation, and AI video generation included on every plan. For a full comparison, see our best social media scheduling tools guide or our tool comparison hub.
Ready to try bulk scheduling? Start your 7-day free trial — upload your first CSV and schedule to all 8 platforms. cancel anytime. Plans from $19/mo.
FAQs
How many posts can I bulk schedule at once?
With PostEverywhere, there's no hard limit. Most users upload 50-200 posts per batch, but you can upload 500+ if needed. The Starter plan ($19/mo) includes 10 social accounts with unlimited posts.
Do I need a special CSV template?
No. PostEverywhere's column mapper handles most CSV formats automatically. At minimum, include columns for caption, date, and time. You can download a pre-configured template from the bulk upload section of the dashboard.
Can I bulk schedule Instagram Reels and TikTok videos?
Yes — include video URLs in your media column. Videos need to meet each platform's requirements (vertical 9:16, under 60 seconds for Shorts/Reels). See our guides on scheduling Instagram Reels and scheduling TikToks.
Does bulk scheduling hurt my reach?
No. Instagram, TikTok, LinkedIn, YouTube, Facebook, X, Threads, and Pinterest all treat API-published posts identically to manual posts. What determines reach is content quality, engagement, and timing — bulk scheduling helps you nail timing consistently.
Can I edit posts after bulk uploading?
Yes. Every post appears in an editable preview grid after upload. You can change captions, swap media, adjust times, or delete individual posts before scheduling. Posts remain editable in your content calendar after scheduling too.
What's the difference between bulk scheduling and cross-posting?
Bulk scheduling means uploading many posts at once from a CSV. Cross-posting means publishing one post to multiple platforms simultaneously. You can combine both: upload a CSV where each row targets all 8 platforms via cross-posting. For specific platform pairs (e.g. Instagram and TikTok or Reels, Shorts and TikTok), our cluster guides cover the per-platform tweaks needed.
Is bulk scheduling free?
Most tools charge for CSV upload / bulk scheduling. PostEverywhere includes it on every plan starting at $19/mo with a 7-day free trial and cancel anytime. See pricing for details.
How do agencies use bulk scheduling?
Agencies typically prepare per-client CSVs in Google Sheets, upload them to PostEverywhere, and use team workspaces for client approval before publishing. The Pro plan ($79/mo) supports 40 accounts with multi-account management — enough for most mid-size agencies. For a broader comparison, see our roundup of social media management for agencies.
Founder & CEO of PostEverywhere. Writing about social media strategy, publishing workflows, and analytics that help brands grow faster.